 EN
 IT Italiano
 ES Español
 FR Français
 DE Deutsch
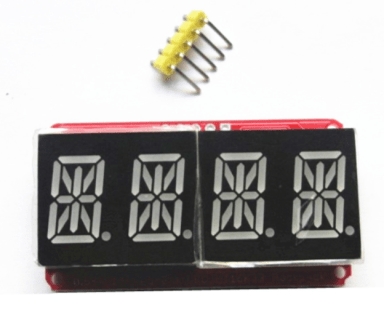
Description
What it is
Red 4-digit I2C-controlled digital segment module, based on the HT16K33 chip, featuring Nixie tube LED display.
Features
- 4 digits
- Nixie tube LED display
- Red color
- I2C control
- HT16K33 chip
What it is for
This module is ideal for displaying numeric data on four digits. It can be used to create counters, numeric displays, time displays, and other projects that require the display of numerical information. It is compatible with Arduino and other I2C microcontrollers.
Tutorial: How to use 4-Digit LED Display Module HT16K33
This HT16K33 module is perfect for displaying numeric data on four red digits. It is ideal for monitoring projects, counters, and time displays.
What you need
- Arduino Uno or compatible
- USB cable
- 4-Digit LED Display Module HT16K33
- 5V power supply
- Arduino IDE software
Steps
- Connect the module’s VCC and GND pins to the 5V and GND of the Arduino
- Connect the SDA and SCL pins of the module to pins A4 and A5 of the Arduino
- Install the Adafruit HT16K33 library in the Arduino IDE software
- Include the library in the Arduino code
- Create an HT16K33Display object
- Set the I2C address of the module
- Initialize the display
- Display numbers or text on the display
Example code
Adafruit_HT16K33 ht16k33; // Creare un oggetto HT16K33Display
ht16k33.begin(0x70); // Impostare l'indirizzo I2C
ht16k33.writeDisplay(1234); // Mostra il numero 1234
Mini project
Create a timer that shows elapsed time in hours, minutes, and seconds.
Common mistakes
- Check that the module is properly powered
- Check the I2C connections
- Verify the I2C address set in the code
- Make sure you have installed the correct library
Recommended accessories
- Resistors to limit current
- Temperature sensors
- Liquid crystal resonators
Frequently asked questions
How can I change the I2C address of the module?
Check the datasheet for specific steps.
The display does not turn on, what should I do?
Check connections and power supply.

Reviews
There are no reviews yet.