 EN
 IT Italiano
 ES Español
 FR Français
 DE Deutsch
Description
Tutorial: How to Use the AM2302 Sensor
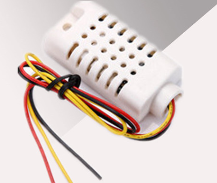
The AM2302 sensor measures temperature and humidity, ideal for environmental monitoring projects.
What you need
- Arduino
- Power Cable (5V)
- Pull-up Resistor (10kΩ)
- Multimeter
Steps
- 1. Connect the sensor to the Arduino: VCC to 5V, D0 to pin D2, GND to GND.
- 2. Attach the pull-up resistor between VCC and D0.
- 3. Check the datasheet for the measurement frequency.
- 4. Load the ‘AM2302’ example onto your Arduino.
- 5. Check the connection with the multimeter.
- 6. Run the code and view the data.
- 7. Calibrate the sensor if necessary.
- 8. Verify the stability of the readings.
Example code
int sensorPin = 2; void setup() { Serial.begin(9600); } void loop() { int sensorValue = analogRead(sensorPin); Serial.println(sensorValue); delay(1000); }Mini project
Build a humidity alarm system for plants in 30 minutes.
Common mistakes
- Omit the pull-up resistor.
- Connect VCC to GND.
- Use an unsupported pin.
- Omit baud rate configuration.
Recommended accessories
- Arduino Uno
- USB cable
- Multimeter
- 10kΩ resistor
Frequently asked questions
The sensor does not read temperature correctly.
Check the connection and stability of the sensor.
What is the measurement frequency of the sensor?
Check the datasheet.
How to calibrate the sensor?
Measure the temperature in a known environment and adjust the data.
The sensor reads the same value all the time.
Check the stability and connection of the sensor.

Reviews
There are no reviews yet.