 EN
 IT Italiano
 ES Español
 FR Français
 DE Deutsch
Description
Technical Description
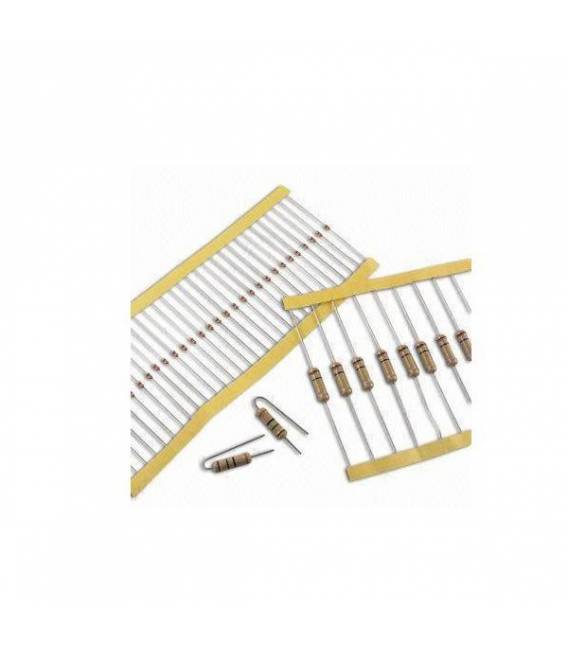
The 3.9K ohm resistor is a fundamental component for limiting the flow of current in an electrical circuit. It is used to protect sensitive components and to create voltage dividers. This type of resistor is used in Arduino projects and other electronic systems to regulate electrical current.
The value of 3.9K ohm is indicated on the component through a color-coded system. The resistor has a tolerance of 5% and a maximum power rating of 1/4 watt. It is important to verify the value of the resistor before using it to ensure it meets the project requirements.
Key Specifications
| Parameter | Value |
| Model | 3.9K ohm Resistor |
| Quantity | 50 pieces |
| Resistive Value | 3900 ohm |
| Tolerance | 5% |
| Maximum Power | 1/4 watt |
| Dimensions | N/D (see manufacturer’s datasheet) |
| Container | N/A (see manufacturer’s technical sheet) |
Installation and Usage
- Check the resistance value using a multimeter.
- Connect the red end of the component to the Arduino pin that you intend to regulate.
- Connect the other black end of the resistor to ground (GND).
- Verify the circuit continuity using a multimeter.
- Insert the resistor into a protoboard or custom 3D printed holder to keep connectors clean and organized.
Compatibility and Requirements
- The resistor is compatible with Arduino Uno and other electronic systems.
- It is used to regulate current and protect sensitive components.
- A multimeter is required to check the value and continuity of the circuit.
Limitations and Important Notes
- Not suitable for circuits requiring power greater than 1/4 watt.
- Connector orientation must be correct to ensure proper operation.
- A 5% tolerance can cause small variations in the actual value of the resistor.
Troubleshooting
The resistor does not work properly.
Probable cause: The value of the resistor does not meet the project requirements.
Solution: Check the value of the resistor using a multimeter and replace the resistor if necessary.
Components connected to the resistor overheat.
Probable cause: The circuit power exceeds the capacity of the resistor.
Solution: Replace the resistor with one of higher power.
The circuit does not respond as expected.
Probable cause: The orientation of the resistor connectors is incorrect.
Solution: Check the orientation of the connectors and correct if necessary.
The resistor burns out.
Probable cause: The resistor was connected to an excessive voltage or current.
Solution: Check the voltage and current values and replace the resistor if necessary.
Use cases
Light Control System
Objective: Adjust the brightness of an LED.
What you need: 3.9K ohm resistor, Arduino Uno, LED.
Steps: 1) Connect the resistor to a PWM pin of the Arduino. 2) Connect the LED to the resistor and GND. 3) Use the Arduino code to adjust the brightness of the LED.
Expected result: The light control system correctly adjusts the brightness of the LED.
Voltage Divider Project
Objective: Create a voltage divider.
What you need: 3.9K ohm resistor, Arduino Uno, 100 ohm resistor.
Steps: 1) Connect the 3.9K ohm resistor to an analog pin of the Arduino. 2) Connect the 100 ohm resistor to the analog pin and GND. 3) Use the Arduino code to measure the divided voltage.
Expected Result: The voltage divider project accurately measures the divided voltage.
Circuit Protection Project
Objective: Protect a sensitive component.
What’s needed: 3.9K ohm resistor, Arduino Uno, sensitive component.
Steps: 1) Connect the resistor between the Arduino pin and the sensitive component. 2) Check the current and voltage on the sensitive component.
Expected Result: The sensitive component is protected from excessive current.
Temperature Control Project
Objective: Adjust a thermostat.
What’s needed: 3.9K ohm resistor, Arduino Uno, thermostat.
Steps: 1) Connect the resistor between the Arduino pin and the thermostat. 2) Use the Arduino code to adjust the temperature.
Expected Result: The thermostat accurately adjusts the temperature.
Motors Control Project
Objective: Adjust the speed of a motor.
What is needed: 3.9K ohm resistor, Arduino Uno, motor.
Steps: 1) Connect the resistor between the Arduino PWM pin and the motor. 2) Use the Arduino code to regulate the motor speed.
Expected result: The motor works correctly at the desired speed.
Fan control project
Objective: Regulate the speed of a fan.
What is needed: 3.9K ohm resistor, Arduino Uno, fan.
Steps: 1) Connect the resistor between the Arduino PWM pin and the fan. 2) Use the Arduino code to regulate the fan speed.
Expected result: The fan works correctly at the desired speed.
Emergency light control project
Objective: Regulate the brightness of emergency lights.
What is needed: 3.9K ohm resistor, Arduino Uno, LED.
Steps: 1) Connect the resistor to a PWM pin on the Arduino. 2) Connect the LED to the resistor and GND. 3) Use the Arduino code to adjust the brightness of the LED.
Expected result: The emergency lights work at the desired brightness.
Blind spot light control project
Objective: Adjust the brightness of blind spot lights.
What you need: 3.9K ohm resistor, Arduino Uno, LED.
Steps: 1) Connect the resistor to a PWM pin on the Arduino. 2) Connect the LED to the resistor and GND. 3) Use the Arduino code to adjust the brightness of the LED.
Expected result: The blind spot lights work at the desired brightness.
In the package
- 50 pieces 3.9K ohm resistor
Complete the project
- 50 Pieces 1000 ohm 1k ohm 1/4w 1/4 w 5%: Useful for projects with resistors of different values.
- 50 Pieces Resistor, 10000 ohm, 10k, ohm 1/4w 1/4 w 5%, Compatible with Arduino: It is used for projects that require high resistance resistors.
Technical FAQs
How do you connect the resistor?
Connect the red end of the component to the Arduino pin you intend to regulate and the other black end to ground (GND).
What is the tolerance value of the resistor?
The tolerance value is 5%, check the datasheet for precise details.
What are the usage limits of the resistor?
It is not suitable for circuits requiring power greater than 1/4 watt and the connector orientation must be correct.
What are the common problems with the resistor?
Common problems include the resistance value not conforming to project requirements, overheating of connected components, and the resistor burning out due to excessive voltage or current.
Tutorial: How to Use 3.9K Ohm Resistor
Resistors are essential for limiting the flow of electrical current in a circuit. This 3.9kΩ resistor is ideal for both beginners and experienced makers.
What you need
- Regulate Current
- Protect Sensitive Components
- Create Voltage Dividers
Steps
- Check the resistance value (3.9K ohm) using a multimeter or by reading the color code.
- Connect the red end of the component to the Arduino pin you want to regulate, and the other black end to ground (GND).
- Check the datasheet to ensure the resistance value meets the requirements of your project.
- If necessary, use a multimeter to test the continuity of the circuit.
- Insert the resistor into a protoboard or custom 3D printed holder to keep the connectors clean and organized.
Mini project
Create a simple light control interface with Arduino: connect the resistor to a PWM pin and use variable LEDs to display the voltage value.
Common mistakes
- Using a resistor that is too low can damage components.
- Failing to properly check the orientation of connectors.
- Using an inappropriate resistor for the circuit’s power.
- Omitting to check the resistor value before use.
Recommended accessories
- Multimeter
- Protoboard
- Arduino Uno
Frequently asked questions
How do you connect the resistor?
Connect the red end to the Arduino pin and the black end to GND.
What is the tolerance value of the resistor?
The tolerance value is 5%, check the datasheet for precise details.
Reviews
There are no reviews yet.