 EN
 IT Italiano
 ES Español
 FR Français
 DE Deutsch
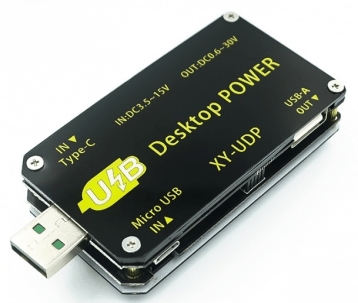
Description
What it is
The Buck-Boost USB CNC Constant Current Module with Color Display is an electronic device designed to regulate output voltage and current, providing a stable power supply to sensitive devices.
Features
- Voltage and Current Regulation
- Color Display
- USB Connection
- Compatibility with CNC Devices
- Constant Current
What it is for
This module is ideal for powering voltage-sensitive devices such as 3D printers, CNC machines, and other electronic projects. The constant current regulation ensures a stable and reliable power supply, improving the precision and performance of connected devices.
Tutorial: How to Use the Buck-Boost USB CNC Constant Current Module with Color Display
This Buck-Boost USB CNC constant current module with color display is ideal for anyone who wants to power voltage-sensitive devices with a stable current. It is particularly useful for 3D printing, CNC, and other devices that require a constant voltage and adjustable current.
What you need
- Arduino Uno or compatible
- USB cable
- voltage and current sensors (check the datasheet)
- connection wires
Steps
- Connect the Buck-Boost module to the Arduino’s USB port
- Configure the output voltage and maximum current through the display and buttons
- Connect the device to be powered to the Buck-Boost module
- Verify the correct power supply of the device with the display
- Adjust the voltage and current as needed based on the device requirements
- Program the Arduino to control the module (check the datasheet)
Example code
/*
* Questo sketch è un esempio di come controllare il modulo Buck-Boost tramite Arduino.
* Verifica le specifiche del modulo per i comandi corretti.
*/
void setup() {
  // Inizializza la comunicazione seriale
  Serial.begin(9600);
}

void loop() {
  // Invia comandi al modulo Buck-Boost per regolare tensione e corrente
  // Verifica sul datasheet per i comandi specifici
}
Mini project
Create a stable power supply system for a 3D printer. Connect the Buck-Boost module to the Arduino and adjust the voltage and current to meet the 3D printer’s requirements. Use the module’s display to monitor the voltage and current during printing.
Common mistakes
- Do not properly adjust the voltage and current
- Do not properly connect the module to the Arduino
- Do not monitor the device during power supply
- Do not verify the module specifications
Recommended accessories
- Voltage and current sensors
- USB A to B cable
- Universal connection wires
- LCD display for Arduino
Frequently asked questions
How to adjust the voltage and current?
Use the module’s buttons to adjust the voltage and current displayed on the screen.
How to control the module with Arduino?
Send serial commands to the Arduino to control the module. Check the datasheet for specific commands.
Reviews
There are no reviews yet.